Setting Up a Proxmox VM with GPU Passthrough and NVIDIA CUDA Drivers

In this guide, we'll walk through configuring a Proxmox VM on a system running an HP Z840 workstation with an NVIDIA RTX 2070 GPU. This includes setting up GPU passthrough, installing NVIDIA CUDA drivers, and running a Docker container leveraging GPU resources. Here's a step-by-step breakdown of the process.
Step 1: Creating the VM in Proxmox
Create a virtual machine in the Proxmox web interface.
Use the default VM settings, ensuring the VM uses the host's processor for optimal performance.

Step 2: GPU Passthrough Configuration
Access the Proxmox GUI:
Select the newly created VM.
Go to the Hardware tab.
Add the GPU:
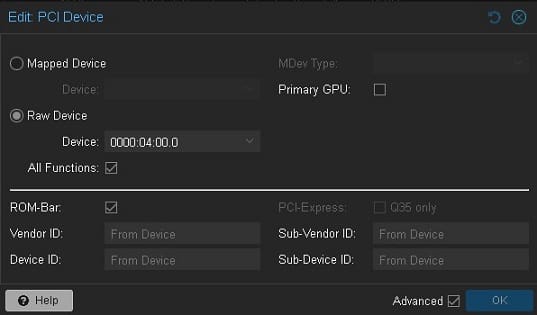
Click Add → PCI Device and select your GPU.
Enable All Functions option and also check the ROM-Bar option.

Step 3: Update GRUB for IOMMU Support on the Host Machine
Edit the GRUB Config:
nano /etc/default/grub
Update the GRUB_CMDLINE_LINUX_DEFAULT line to include:
intel_iommu=on iommu=pt

Apply the changes by running the following command:
update-grub
Restart your Proxmox host for the changes to take effect.
Step 4: Update Debian Repository Sources for the VM
Edit the Sources List:
nano /etc/apt/sources.list
Add the following lines to include all required repositories:
deb-src http://security.debian.org/debian-security bookworm-security main contrib non-free non-free-firmware
deb-src http://deb.debian.org/debian/ bookworm main contrib non-free non-free-firmware
deb http://deb.debian.org/debian/ bookworm main contrib non-free non-free-firmware
deb http://deb.debian.org/debian/ bookworm-updates main contrib non-free non-free-firmware
deb-src http://deb.debian.org/debian/ bookworm-updates main contrib non-free non-free-firmware
deb http://security.debian.org/debian-security bookworm-security main contrib non-free non-free-firmware
Update and Upgrade the System:
apt update
apt upgrade
Step 5: Install Docker on the VMref. https://docs.docker.com/engine/install/debian/
Add Docker's official GPG key:
sudo apt-get update
sudo apt-get install ca-certificates curl
sudo install -m 0755 -d /etc/apt/keyrings
sudo curl -fsSL https://download.docker.com/linux/debian/gpg -o /etc/apt/keyrings/docker.asc
sudo chmod a+r /etc/apt/keyrings/docker.asc
Add the repository to Apt sources:
echo
"deb [arch=$(dpkg --print-architecture) signed-by=/etc/apt/keyrings/docker.asc] https://download.docker.com/linux/debian
$(. /etc/os-release && echo "$VERSION_CODENAME") stable" |
sudo tee /etc/apt/sources.list.d/docker.list > /dev/null
sudo apt-get update
Install the Docker packages.
sudo apt-get install docker-ce docker-ce-cli containerd.io docker-buildx-plugin docker-compose-pluginStep 6: Install Essential Packages
Run the following commands to install basic tools and dependencies(Since the Debian image in use is minimal, sudo must be installed.)
apt-get install sudo
apt-get install curl
sudo apt-get install -y gnupg software-properties-common
Step 7: Install NVIDIA CUDA Toolkit
Download the CUDA Repository:
wget https://developer.download.nvidia.com/compute/cuda/12.5.1/local_installers/cuda-repo-debian12-12-5-local_12.5.1-555.42.06-1_amd64.deb
Install the Repository:
sudo dpkg -i cuda-repo-debian12-12-5-local_12.5.1-555.42.06-1_amd64.deb
Add the GPG Key:
sudo cp /var/cuda-repo-debian12-12-5-local/cuda-*-keyring.gpg /usr/share/keyrings/
Install CUDA Toolkit and Drivers:
sudo apt-get -y install cuda-toolkit-12-5
sudo apt-get install -y nvidia-kernel-open-dkms
sudo apt install nvidia-driver -y
sudo apt-get install -y cuda-drivers
Step 8: Blacklist Nouveau Driver
Edit the Configuration File:
sudo nano /etc/modprobe.d/blacklist-nouveau.conf
Add the following lines:
blacklist nouveau
options nouveau modeset=0
Reboot the VM.
Step 9: Install NVIDIA Container Toolkit:
Add NVIDIA Container Toolkit Repository:
curl -fsSL https://nvidia.github.io/libnvidia-container/gpgkey | sudo gpg --dearmor -o /usr/share/keyrings/nvidia-container-toolkit-keyring.gpg
curl -s -L https://nvidia.github.io/libnvidia-container/stable/deb/nvidia-container-toolkit.list |
sed 's#deb https://#deb [signed-by=/usr/share/keyrings/nvidia-container-toolkit-keyring.gpg] https://#g' |
sudo tee /etc/apt/sources.list.d/nvidia-container-toolkit.list
Update and Install the Toolkit:
sudo apt-get update
sudo apt-get install -y nvidia-container-toolkit
sudo nvidia-ctk runtime configure --runtime=docker
Restart Docker:
sudo systemctl restart docker
Step 10: Run a GPU-Accelerated Docker Container:
Launch a container that leverages GPU acceleration:
docker run -d -p 3000:8080 --gpus=all -v /opt/docker/ollama:/root/.ollama -v /opt/docker/ollama/open-webui:/app/backend/data --name open-webui --restart always ghcr.io/open-webui/open-webui:ollama
Step 11: Verify GPU Configuration
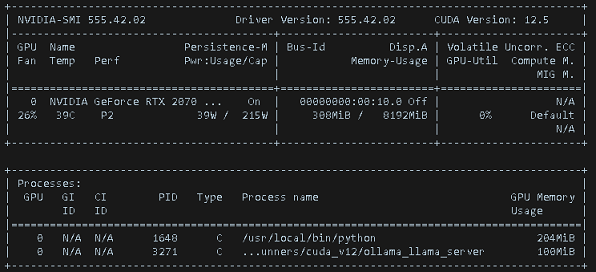
To ensure the GPU passthrough and drivers are working correctly, run the following command inside your VM:
nvidia-smi
This command will display detailed information about your GPU, including its model, memory usage, and active processes. If everything is set up correctly, you should see a screen similar to this.